As I'm sure you know if you're a card-maker, sewer or crafter, it can be quite an expensive hobby! ;)
es·pe·cial·ly...
Card-making! Patterned and plain Papers, Card Blanks, Envelopes, Stamps, Inks, Glitter, Glues and other Adhesives, Extras such as Divine twine or yarn, ribbons, buttttons, and the wide, varied, oh-so-expensive range of sticker embellishments! And that's not even including tools such as craft knifes, bone folders, eyelets and eyelet setters, Alphabet and outline stickers... We could be here quite some time! ;)
It really adds up, doesn't it? Which is why I am going to share with you as many tips as I can for making those beautiful handmade cards on the cheap! I can't promise how regular it will be, but I'll do my best!
My first little tip is one you may know, but for those of you who don't, I'll fill you in. It's a great little trick for making your own brad embellishments for next to nothing, instead of buying those super-expensive ones in a craft shop! I mean, just look at these "American Crafts" Glittered brads on Amazon. $5.81 plus shipping for only 4 different colours! No Thank You! Here's how to make your OWN:
You will need:

A Pack of Plain Brads or Paper Fasteners.You can buy these in any office supplies store for really cheap, but chances are you already have a pack!
Some PVA Glue
Glitter (whatever colour you like, you probably have a few packs!)
Scrap piece of card (not pictured, whoops!)

(Tissue is optional, I created
a messa glitter and glue explosion while doing this)1. Squirt a dollop of Glue onto your scrap of card.
2. Take a Brad. Dunk your poor, helpless brad headfirst into the sticky sea. This will apply an even covering of Glue onto the top of the brad. Not too much, or it'll all slide off and die, not too little or the glitter won't stick. (It really is simple, I'm just making it seem really complicated so this sounds like an actual tutorial and not something you can do with your eyes shut.)

3. Next, dunk your gluey brad in a pot of glitter. You can sprinkle glitter over it instead, but this is wayyy more satisfying!
4. Stick your brad into a ball of Blue-Tack to keep it upright during the drying process.
And that's it! Homemade glitter brads you can use for Cards, Scrapbooking, Gift-Tags.. whatever you want! Told you it was easy!

 *WARNING* You will soon become addicted, make hundreds of them in every single colour of glitter you own, go to the shops, buy a cardmaking magazine that has free glitters with it, and make more. Or is that just me?! ;)
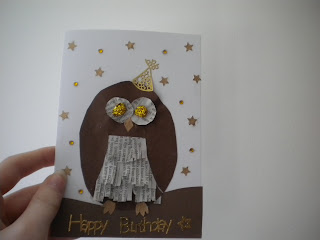
 Here thay are all lined up! Aren't they pretty?! I took a ridiculous amount of photos of these, but they take so long to upload to my computer I'll just finish with this >> cute card I made using the glittered brads. See, they're the owl's eyes! :) This was a project in a Papercraft Inspirations mag that I modified and added glittered brads too!
Have you made these before or do you have any other "Cardmaking on the Cheap" tips? Leave a comment below and I'll get back to you! S xx


Hi, thanks for the tip and tute! Looking forward to more :)
ReplyDeleteFound you on the Outlawz Follow Me forum and now following.
Lisa x
papercraftbliss.com
Thanks Lisa - I love your site, it's fab! :)
ReplyDeleteHow fun are these! I'm going to make some! Met you on The Outlawz!
ReplyDeleteHugz,
Roxann
Siona, I love this tip! I love the glitter brads, but I have always been too cheap to spring for them when there are so many other card making essentials to buy, like cardstock and designer paper and punches and.....
ReplyDeleteI am so glad that I have found you through The Outlawz Follow Me forum!. I am now very enthusiastically following you. I hope you will visit me at my blog, Tickell Expressions.
Blessings,
Teresa
Thanks Teresa - I could never justify buying these either!
ReplyDelete